Skip to content
positively certifiable

Banish OEM self-signed certs forever and roll your own private LetsEncrypt

Toss certbot or acme.sh onto some servers and baby, you got a stew going!

Lee Hutchinson | 123
Credit: Aurich Lawson | Getty Images
Story text

Previously, on "Weekend Projects for Homelab Admins With Control Issues," we created our own dynamically updating DNS and DHCP setup with bind and dhcpd. We laughed. We cried. We hurled. Bonds were forged, never to be broken. And I hope we all took a little something special away from the journey—namely, a dynamically updating DNS and DHCP setup. Which we're now going to put to use!

If you're joining us fresh, without having gone through the previous part and wanting to follow this tutorial, howdy! There might be some parts that are more difficult to complete without a local instance of bind (or other authoritative resolver compatible with nsupdate). We'll talk more about this when we get there, but just know that if you want to pause and go do part one first, you may have an easier time following along.

The quick version: A LetsEncrypt of our own

This article will walk through the process of installing step-ca, a standalone certificate authority-in-a-box. We'll then configure step-ca with an ACME provisioner—that's Automatic Certificate Management Environment, the technology that underpins LetsEncrypt and facilitates the automatic provisioning, renewal, and revocation of SSL/TLS certificates.

After we get step-ca listening for incoming ACME requests, we'll talk through the ways to get the self-hosted services on your LAN-speaking ACME so they can start automatically requesting certificates from our step-ca certificate authority—just like how LetsEncrypt works.

I'll focus exclusively on using acme.sh for requesting and renewing certs on clients because it's the tool I'm most familiar with. But everything we do should be doable with any ACME client, so if you're more comfy with certbot or dehydrated whatever, feel free to use that on your clients. The instructions should be pretty easy to adapt.

I didn’t understand any of that—we’re doing what now?

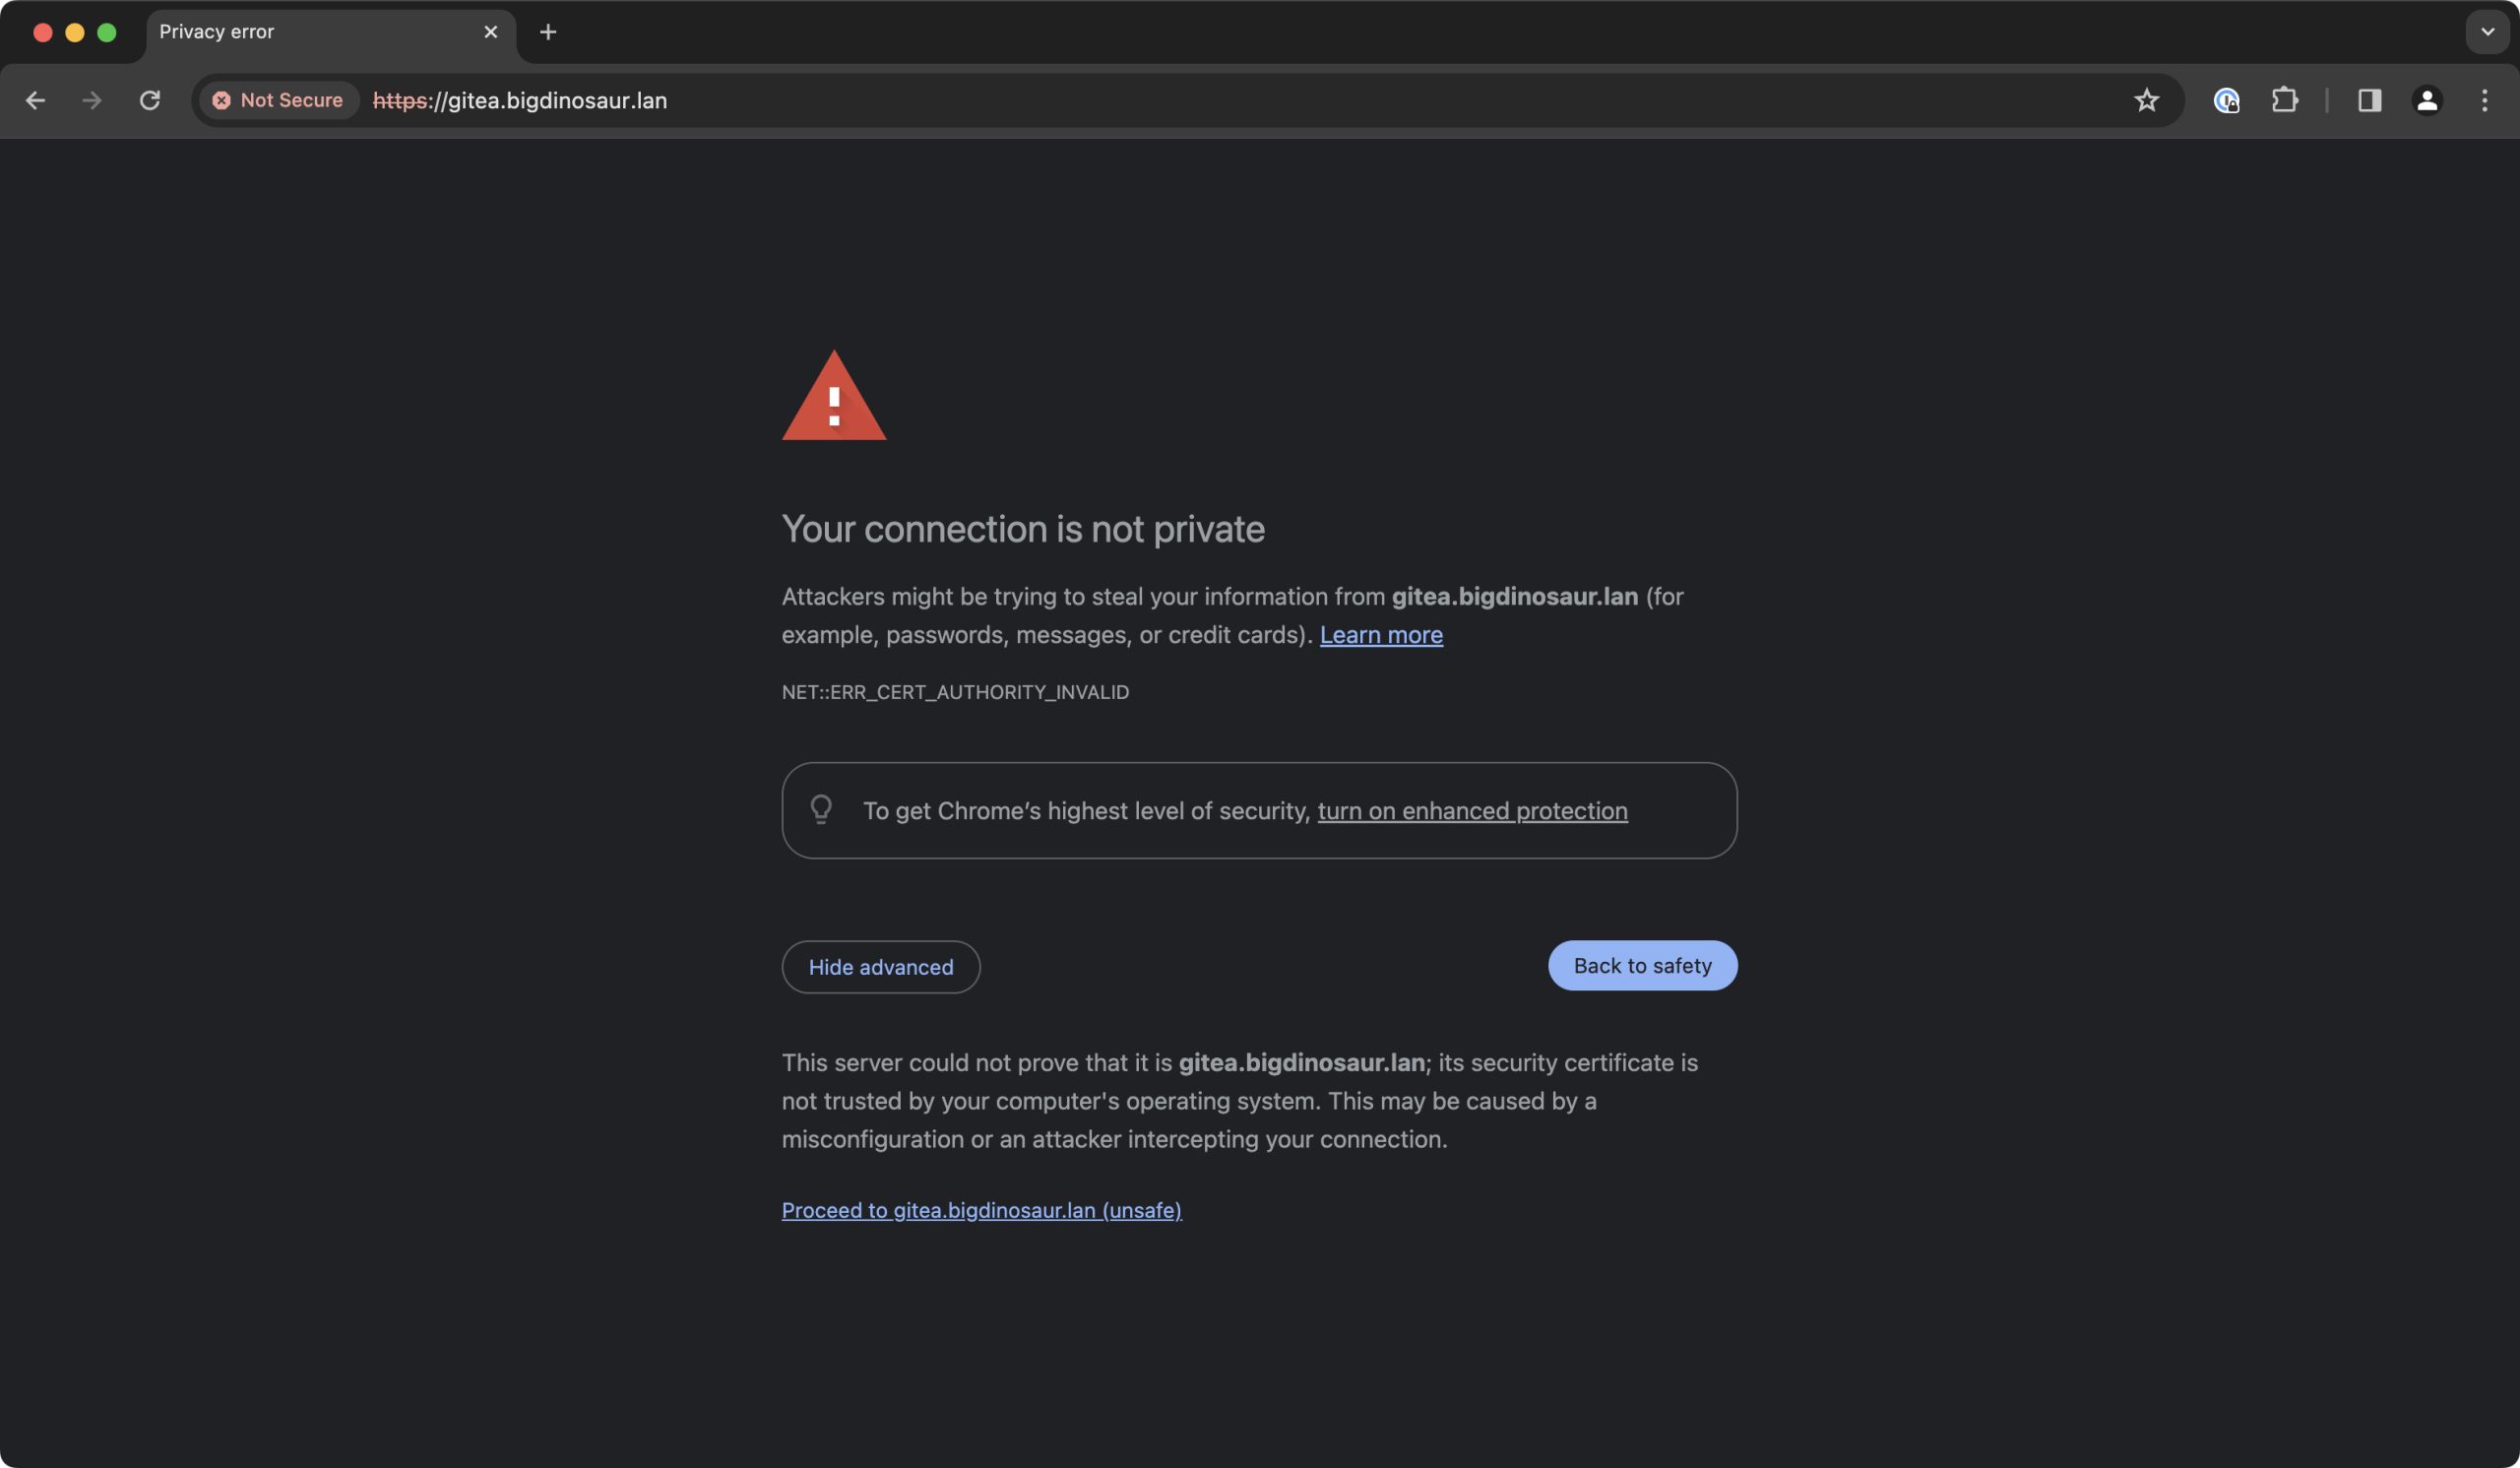
So you know how you install a new self-hosted thing on your LAN, and when you log into its web interface, you get a "your connection isn't secure" warning because the thing you just installed is using a self-signed TLS certificate?

screengrab of a self-signed TLS warning
Warning blindness is a bad thing. This screen has important things to say.
Warning blindness is a bad thing. This screen has important things to say. Credit: Lee Hutchinson

Those warnings seem spurious, and most people quickly become blind to them, but they serve a very important purpose—even if it's a purpose a lot of people don't care about.

See, web browsers use TLS and HTTPS to try to accomplish two connected and equally important things: first, and most obviously, to encrypt the connection between you and the web resource you're accessing. But the second purpose—the one upended by self-signed certs and the source of the big warnings—is identity verification. An assurance that your encrypted communication is going to the person you think it's going to is almost as vital as having the communication encrypted in the first place.

A chain of trust extends from the various root certificate authorities down through the TLS certificates they issue to endpoints, and, at least in theory, one should be able to trust that a CA has done some amount of due diligence to verify the identity and ownership of the endpoints it issues certificates to. When you trust a certificate authority, you are trusting that the identity attestations on the certificates that CA issues are in fact accurate—that seeing a cert for "www.example.com" really does mean you're browsing "www.example.com" and not a site pretending to be that (or that your connection isn't being compromised via a man-in-the-middle type attack).

Self-signed certificates break that chain of trust. Your browser has no way to validate that the resource is what its certificate says it is, because your browser doesn't trust the issuer.

This is why browsers show big scary warnings when you visit a page that presents a self-signed cert: You have encryption, but no identity verification. To banish the warnings, we have to have both—which is what we aim to provide with our step-ca installation. We're going to set up our own CA and get it trusted by your browser and by the devices and services for which it's going to be issuing certificates.

Why is this even necessary?

Honestly, it's not—you can continue to click through and ignore self-signed or otherwise invalid OEM certificates on your LAN and homelab because you're probably pretty sure of the provenance of the services behind those self-signed certs. But familiarity breeds contempt, and it's a terrible idea to get into the habit of dismissing TLS warning messages. They can warn you of legitimate danger if a site is compromised; thinking of them as something stupid to be routinely ignored is damaging and lessens the overall effectiveness of SSL/TLS.

And all things considered, this will be pretty easy, even if it sounds intimidating. (It will be easier than setting up bind and dhcpd!) For a long time, I churned out my own certificates using a rickety little ad-hoc CA I'd built with this tutorial and manually copied them into place on all my LAN boxes. But the tools are there to make automation both super easy and super reliable, so we're going to use the tools.

What are we hosting this on?

If you built a project VM or container for part one, there's nothing preventing you from adding step-ca to it—the resource load is extremely light. Or, if you prefer some separation in your services, you can install step-ca on a new VM or container or pretty much anything you've got lying around, including a Raspberry Pi (there are actively maintained ARM releases of step-ca available if that's your jam).

I'm using a separate LXC container from the one I used for bind and dhcpd. Like with the previous container, I have it configured with 512MB of RAM and 8GB of disk space (though I could go with less of both if necessary), and it will be running Ubuntu 22.04 LTS.

As before, you certainly don't have to use Ubuntu—use the Linux distro of your choice. Or use BSD. Use whatever makes you happy! (Just don't use Windows. As with the last tutorial, I'm sure there's a way to get these same results on the Windows side of the house, but this is not a Windows tutorial, and I have no idea what those ways are.)

So regardless of how, get yourself to a bash prompt, make a note of your box's hostname and IP address, and let's jump in.

(A brief note: when I was figuring this stuff out, I leaned heavily on step-ca's extensive and well-written tutorial documentation, and many of the procedures we'll use in this piece are lifted directly from there. Massive props to the folks at Smallstep for creating such a great repository of how-tos. If you have questions that I don't answer in this tutorial, definitely check the docs because unlike many other projects, step-ca's are very, very good.)

Installing step-ca

Because there's no official repo to use, we'll be installing step-ca via dpkg. We'll need two installer files: one for step-ca itself and the other for the step-cli command line tools that we'll use to administer step-ca. Grab and run both with these commands:

$ wget https://dl.smallstep.com/cli/docs-ca-install/latest/step-cli_amd64.deb
$ wget https://dl.smallstep.com/certificates/docs-ca-install/latest/step-ca_amd64.deb
$ sudo dpkg -i step-cli_amd64.deb step-ca_amd64.deb

(If you're not using Ubuntu, there are RPM and other packages available for other distros—check the docs for details. But from here on out, I'll only be listing Ubuntu commands because I am lazy.)

Let's initialize step-ca so it writes some files and sets up shop. We don't have to use sudo for this command because we're not setting things up system-wide yet—that will come a few steps later.

$ step ca init

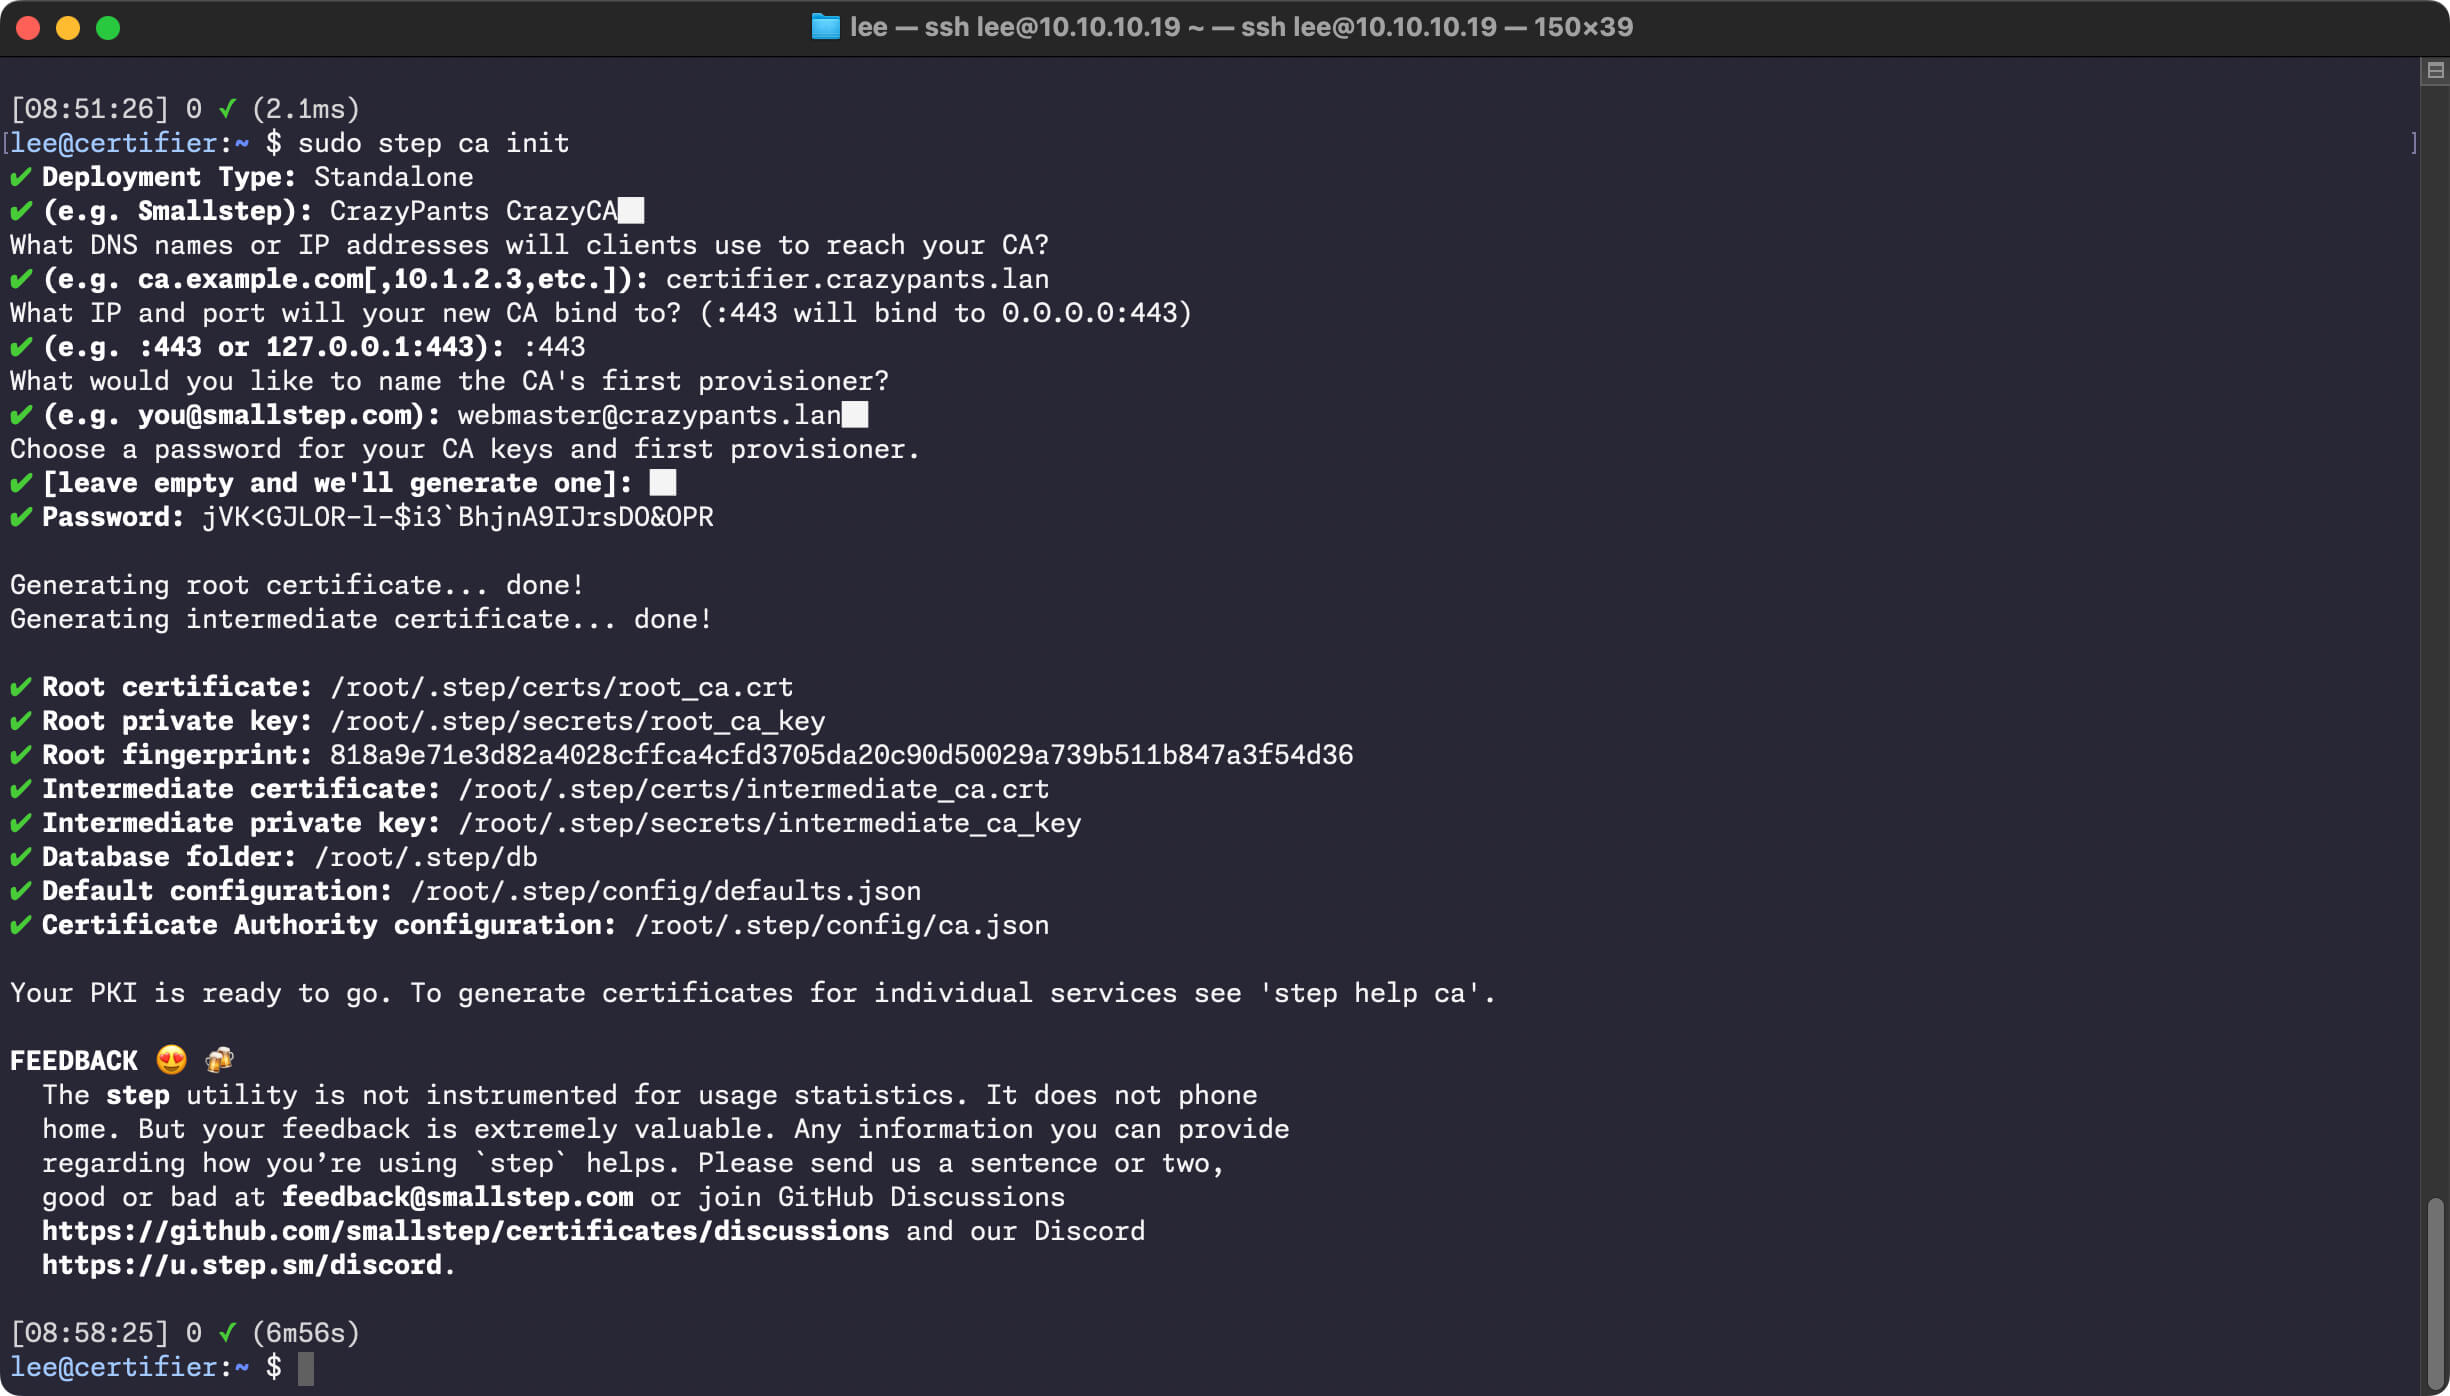
This will kick off a script that will ask you a number of questions. First, we'll want to run our CA in standalone mode, so pick that. Next, to the question "What would you like to name your new PKI?", supply what you'd like your new CA to be called. Next give the hostname of the box on which we're installing step-ca, the port you want to bind to (I use :443, to bind to port 443 on all IPv4 interfaces), and the name you want to appear on your certificates as the "provisioner" (I'd recommend "[email protected]," substituting in your LAN domain for "crazypants.lan"). Finally, the script will ask you for a password for your CA keys—let it auto-generate one and keep it handy, as we'll use it in just a moment.

Screengrab of the ca-init command
Init'ing that certificate authority.
Init'ing that certificate authority. Credit: Lee Hutchinson

The script will chew on what you've given it, and after a couple of seconds, your certificate authority will be set up and operational. The script creates both a root certificate for your LAN CA and also an intermediate certificate—each has an important role to play in the public key infrastructure you've created.

(Briefly, the root CA is self-signed and establishes the root of trust for the CA, and one or more intermediate certificates are used to actually sign client certificate requests and issue certificates. In the event of compromise, it's much easier to replace an intermediate cert and not break the chain of trust with clients than it is to replace the root cert! But don't take my word for it—this is a complicated topic, and it's worth reading about in-depth.)

We also want to enable our new CA to understand and respond to ACME requests, so run the following command to make that happen:

$ step ca provisioner add acme --type ACME

Before we move on, let's stash that CA password in a text file called password.txt in our current step-ca working directory under your home:

$ touch ~/.step/password.txt

Edit that text file and paste the generated CA password into it. Once you're saved out of the file, adjust its permissions so that only the owning account can read it:

$ chmod 400 ~/.step/password.txt

Trusting the new CA

Now that step-ca has created its root and intermediate certificates, we want to add its root cert to the host's certificate trust store so that our host doesn't freak out when we start doing certificate authority stuff with our new certificate authority.

The right way to do this is to copy only the root certificate into the trust store and then make sure to include the intermediate certificate on clients so they have a complete chain of trust. But I'm lazy, and this is for a LAN-only CA. We're not curing cancer or going to space here. Human lives are not riding on your homelab. (Or, at least, they shouldn't be.) So I did the easy thing and copied both the root and the intermediate certificate into the root trust store. You can be a rule-follower and just copy the root certificate, or you can be lazy like me—your call:

$ sudo cp ~/.step/certs/root_ca.crt /usr/local/share/ca-certificates/
$ sudo cp ~/.step/certs/intermediate_ca.crt /usr/local/share/ca-certificates/
$ sudo update-ca-certificates


If successful, you should see "2 added, 0 removed; done" in the output of the update-ca-certificates command.

Summoning daemons, part one: Preparing the ritual

We have a trusted CA, but it's not actually doing anything yet. We could manually poke at it with command line tools to make it issue certs, but what we really want to do is daemonize step-ca so it will run as a systemd service. The first thing that process requires is a user context under which to run the service, so let's create that user:

$ sudo useradd --system --home /etc/step-ca --shell /bin/false step

It's also a good idea to use setcap to allow step-ca to listen for cert renewal requests on port 443 like a real server rather than a higher port:

$ sudo setcap CAP_NET_BIND_SERVICE=+eip $(which step-ca)

Now let's move the CA out from its default install location under your home directory and into a more accessible system-wide location under the /etc directory:

$ sudo mv ~/.step /etc/step-ca

Then, while we're here, let's go ahead and fix the ownership on the step-ca directory so that it's owned by the step user we created a moment ago:

$ sudo chown -R step:step /etc/step-ca

It's also time to modify the contents of our step-ca instance's configuration files to tell it that we've moved all of its stuff around. Pop open the smaller of the two step-ca config files for editing:

$ sudo vim /etc/step-ca/config/defaults.json

We want to hunt down every instance of /home/youraccount/.step/ and replace them all with /etc/step-ca/ instead. My defaults.json file needed two such replacements, on line 3 (the ca-config line) and line 5 (the root line).

If you're doing this in vi or vim, you can accomplish the necessary searching and replacing with the magic of the substitution command:

:%s/home\/youraccount\/\.step/etc\/step-ca/g

Your defaults.json file ought to look something like this when done:

{
"ca-url": "https://certifier.crazypants.lan",
"ca-config": "/etc/step-ca/config/ca.json",
"fingerprint": "big "ol' string",
"root": "/etc/step-ca/certs/root_ca.crt"
}

...except instead of "big ol' string," it'll have a big ol' string of letters and numbers in there.

Next, we repeat the same substitution procedure on the other config file:

$ sudo vim /etc/step-ca/config/ca.json

My copy of ca.json needed four substitutions, on what, for me, were lines 2, 4, 5, and 16. I won't paste ca.json file in here because it's considerably longer than defaults.json, but if you found four substitutions, then you're probably good.

Before we move on from ca.json, let's make one more set of changes. By default, step-ca's TLS certificates are valid for 24 hours, and I find that inconveniently short. Let's change the expiration to seven days, which gives us a bit more breathing room so our certs won't all expire if we ever have to take the CA offline for more than a day.

To change the default expiration length, look for the claims section and add the following three lines:

"claims:" {
"defaultTLSCertDuration": "168h",
"minTLSCertDuration": "24h,
"maxTLSCertDuration": "168h",

(Note that because this is a JSON file, you might want to paste it into a JSON validator like this one before saving it because JSON is picky, and adding lines without being mindful of its particular syntax preferences can cause errors.)

With those changes made, save and close ca.json.

Summoning daemons, part two: Performing unholy invocations

If you've never created a systemd service from scratch before, you should know that just as with summoning an actual demon, this process looks a lot scarier than it is. The trans-planar entity called forth from the depths by our arcana will be bound under our control the entire time, and we will be completely safe. The only way anything can go wrong is if the circle of protection is broken or if you give the demon power over you by telling it your True Name.

With that in mind, let's make ourselves a systemd service definition by creating and editing the following file:

$ sudo vim /etc/systemd/system/step-ca.service

Paste in the following configuration (which I'm lifting wholesale from the official docs):

[Unit]
Description=step-ca service
Documentation=https://smallstep.com/docs/step-ca
Documentation=https://smallstep.com/docs/step-ca/certificate-authority-server-production
After=network-online.target
Wants=network-online.target
StartLimitIntervalSec=30
StartLimitBurst=3
ConditionFileNotEmpty=/etc/step-ca/config/ca.json
ConditionFileNotEmpty=/etc/step-ca/password.txt

[Service]
Type=simple
User=step
Group=step
Environment=STEPPATH=/etc/step-ca
WorkingDirectory=/etc/step-ca
ExecStart=/usr/bin/step-ca config/ca.json --password-file password.txt
ExecReload=/bin/kill --signal HUP $MAINPID
Restart=on-failure
RestartSec=5
TimeoutStopSec=30
StartLimitInterval=30
StartLimitBurst=3

; Process capabilities & privileges
AmbientCapabilities=CAP_NET_BIND_SERVICE
CapabilityBoundingSet=CAP_NET_BIND_SERVICE
SecureBits=keep-caps
NoNewPrivileges=yes

; Sandboxing
ProtectSystem=full
ProtectHome=true
RestrictNamespaces=true
RestrictAddressFamilies=AF_UNIX AF_INET AF_INET6
PrivateTmp=true
PrivateDevices=true
ProtectClock=true
ProtectControlGroups=true
ProtectKernelTunables=true
ProtectKernelLogs=true
ProtectKernelModules=true
LockPersonality=true
RestrictSUIDSGID=true
RemoveIPC=true
RestrictRealtime=true
SystemCallFilter=@system-service
SystemCallArchitectures=native
MemoryDenyWriteExecute=true
ReadWriteDirectories=/etc/step-ca/db

[Install]
WantedBy=multi-user.target

Once that file is created, we'll have systemd re-scan its unit files so it picks up our new service, and then we'll enable the service and get it running:

$ sudo systemctl daemon-reload
$ sudo systemctl enable --now step-ca

Assuming the configuration is all correct without any typos, step-ca should now be resident in memory:

screenshot of ps command output
Yep, step is running.
Yep, step is running. Credit: Lee Hutchinson

If step-ca isn't running, you can ask systemd what's wrong, and it might even give you some useful results:

$ sudo journalctl --follow --unit=step-ca

...but you shouldn't have to do that because it ought to be running fine. And if so, congrats—step-ca is configured, and we have ourselves a listening LetsEncrypt-style certificate authority, ready to issue certs to ACME-speaking clients!

To DNS-01 or HTTP-01, that is the question

We come now to the place in the article where we need to decide how our CA will validate our LAN clients' identities when they ask for certificates. In the ACME spec, there are multiple types of "challenges" that clients can answer; the two most common are the "HTTP-01" challenge and the "DNS-01" challenge.

For the HTTP-01 challenge, the CA presents the requesting client with a token, and the client must present the same token back to the server via a special self-hosted URL. The idea here is that if you want a certificate for www.buttsinabox.org, then you need to be able to demonstrate ownership of www.buttsinabox.org by presenting the HTTP-01 token from that host.

The potential problem with HTTP-01 in a homelab context is that it requires the use of port 80 on the client, and port 80 is often already in use on a homelab client because you're already running a web interface there. (There are many easy workarounds if you're committed to HTTP-01, though!)

The solution I prefer is to use the other most common ACME challenge—DNS-01. With DNS-01, rather than attesting your ownership of www.buttsinabox.org by serving the challenge token back from that URL, you attest your ownership by modifying the authoritative DNS for the buttsinabox.org zone and adding a TXT record there containing the challenge token. The CA then does a DNS query for that TXT record, and if it finds it, the cert is issued.

And guess what we have standing by, dutifully answering queries for our LAN domain? Why, hey, it's that DNS server we built back in part one!

Screenshot of Hannibal from "The A-Team" and his catchphrase
Hannibal is my spirit animal.

Here's the important bit for people who are following along at home without a handy LAN DNS server: It's best to have both HTTP-01 and DNS-01 as available options because HTTP-01 can be a pain in the ass. I found DNS-01 to be much more reliable for this particular LAN-only use case. But DNS-01 definitely isn't required, so read on either way!

ACME acres

All that being said, we have now come to the part where we'll test the entire thing out, front to back, by requesting a TLS certificate. To do that, we need an ACME client—and my client of choice is Neilpang's acme.sh.

(If you're more comfortable with certbot or something else, then by all means, use that! But these instructions will be for acme.sh.)

I'll first issue a dummy certificate, just to verify the process works. I'm going to make the request from a fresh and empty LXC container running Ubuntu 22.04, and there are a few prerequisites to fulfill.

First, we need to tell our requesting client to trust the step-ca certificate authority. We do that the same way we did on the actual step-ca box: by copying the CA root certificate into the requesting client's trust store. Since we're keeping our certs in an ASCII format, we can accomplish this without needing to transfer any files between hosts—first do this on the step-ca box to get the certificate:

$ sudo cat /etc/step-ca/certs/root_ca.crt

Copy the contents of root_ca.crt to your clipboard and then create a new file on your requesting client to paste them into:

$ sudo vim /usr/local/share/ca-certificates/root_ca.crt

Repeat the process with intermediate_ca.crt if you're lazy like me and then refresh the client's certificate trust store so it picks up your addition(s):

$ sudo update-ca-certificates

Next, we need to equip our requesting host with the cryptographic key it will need to create the DNS TXT record that the DNS-01 challenge will require it to create. If you followed part one, this key is something you're already familiar with: it's the rndc.key file we produced with the rndc-confgen tool. Our dhcpd service uses it to update DNS zone files with dynamic DHCP clients, and now we'll use it to let our issuance process update the same bind zone file. (Note that rndc.key is a powerful tool that can authorize a lot of operations on your DNS server. For a homelab, we don't particularly care, but if for some strange reason you're following this guide in a production environment, you should use a properly scoped DNS update keys and not the god-key like we're doing here.)

As with the CA certificates, the key file is formatted in plaintext, and you can simply cat it on our bind server so its contents are on the screen and copy-able:

$ sudo cat /root/rndc.key

To keep things simple, create the exact same file on our test client at /root/rndc.key and paste the remote file's contents in there. When done, chmod the file to 400 to keep prying eyes out.

(If you didn't follow part one and have no DNS server, you'll also have no rndc.key file to copy—which is fine since you won't be doing DNS-01 challenges anyway. You can install acme.sh and then skip a bit further down to where we do a test HTTP-01 challenge.)

Finally, we need to install acme.sh, without which none of this will work. There are multiple install options, but we're going to go with the method that doesn't involve piping a remote script into bash because that gives me the heebie-jeebies.

The instructions for installing acme.sh say it's best to do this as root, so let's do that, then install the thing and clean up our install directory when done. We'll also install a couple of prerequisites while we're here.

$ sudo -i
# apt install git curl
# git clone https://github.com/acmesh-official/acme.sh.git
# cd /root/acme.sh
# ./acme.sh --install -m [email protected]
# cd ..
# rm -rf /root/acme.sh

Now let's pop into the newly created /root/.acme.sh directory and edit our configuration so that acme.sh knows what to do with itself. The file we want to get into is at /root/.acme.sh/account.conf, so open that up for editing:

# vim /root/.acme.sh/account.conf

Aside from some commented lines, the file should have two entries: one for ACCOUNT_EMAIL and one for an UPGRADE HASH. We want to make the following additions below those two existing entries:

SAVED_NSUPDATE_SERVER='dnsbox.crazypants.lan'
SAVED_NSUPDATE_KEY='/root/rndc.key'
SAVED_NSUPDATE_ZONE='crazypants.lan'
CA_BUNDLE='/usr/local/share/ca-certificates/root_ca.crt'
USER_PATH='/usr/local/sbin:/usr/local/bin:/usr/sbin:/usr/bin:/sbin:/bin:/snap/bin'

Here's a quick breakdown of what we're adding:

  • SAVED_NSUPDATE_SERVER should point at fully qualified hostname for your running bind instance (which was dnsbox.crazypants.lan in part one). This FQDN must be resolvable by the requesting client, and the IP address it resolves to must be reachable. (In other words, a forward lookup on whatever hostname you put here must succeed.) Alternately, you can put an IP address here and not have to mess with name resolution, though you really, really should have resolution working here first to fully validate the configuration.
  • SAVED_NSUPDATE_KEY is the path to your rndc.key file.
  • SAVED_NSUPDATE_ZONE is the specific bind zone that we'll be modifying to answer the DNS-01 challenge.
  • CA_BUNDLE should point at the root certificate for our LAN CA.

And that ought to be all acme.sh needs to do its thing. Log out and then log back in to our requesting client so that the path changes put in by the acme.sh installer are made active.

Actually issuing a cert—here we go

Here's the command we're going to run—but don't run it yet because we should go through what all the options mean first.

$ sudo acme.sh --issue --dns dns_nsupdate -d madeuphost.crazypants.lan --server https://certifier.crazypants.lan/acme/acme/directory --days 5 --ca-bundle /usr/local/share/ca-certificates/root_ca.crt --dnssleep 2

The breakdown:

  • --issue means, perhaps unsurprisingly, that we're asking acme.sh to request a new certificate rather than a renewal.
  • --dns dns_nsupdate tells acme.sh we want to use the DNS-01 challenge and that we'll be using nsupdate instead of a provider-specific API to create our DNS challenge records.
  • -d madeuphost.crazypants.lan indicates that the domain name we're requesting a certificate for is "madeuphost.crazypants.lan". Feel free to substitute in your own made-up hostname.
  • --server https://certifier.crazypants.lan/acme/acme/directory specifies the hostname of the ACME server acme.sh will try to connect to and request a certificate, along with the path it's going to use. (You don't have to worry about setting that path up—it's configured automatically by step-ca.)
  • --days 5 is how long we want our certificate to be valid for. You can put whatever you'd like here, up to the seven-day max we specified in the step-ca config.
  • --ca-bundle /usr/local/share/ca-certificates/root_ca.crt tells acme.sh what certificate to trust so that when it establishes a secure connection with the issuing ACME server, it knows the connection is secure.
  • --keylength ec-384 requests a certificate with an elliptic curve key, using the P-384 curve.
  • --dnssleep 2 tells acme.sh how many seconds to wait after it creates our TXT records before attempting to check them.

If you have your own requirements or would prefer to change any of these settings, feel free—it's your homelab. For example, if you wanted to try issuing a certificate with multiple SANs, or with a wildcard, you'd do that by including additional -d flags:

$ sudo acme.sh --issue --dns dns_nsupdate -d madeuphost.crazypants.lan -d somethingelse.crazypants.lan -d *.crazypants.lan …

However you want to do your first issuance, we're ready to give it a shot. It's time to say the words and flip the switch.

Assuming everything works—and let's assume it will because I'm told being positive is a good character trait!—you'll be able to follow along and watch your certificate being generated. The output should look something like this:

$ sudo acme.sh --issue --dns dns_nsupdate -d madeuphost.crazypants.lan --server https://certifier.crazypants.lan/acme/acme/directory --days 5 --ca-bundle /usr/local/share/ca-certificates/root_ca.crt --keylength ec-384 --dnssleep 2

[Tue Feb 13 14:56:20 UTC 2024] Using CA: https://certifier.crazypants.lan/acme/acme/directory
[Tue Feb 13 14:56:20 UTC 2024] Creating domain key
[Tue Feb 13 14:56:20 UTC 2024] The domain key is here: /root/.acme.sh/madeuphost.crazypants.lan_ecc/madeuphost.crazypants.lan.key
[Tue Feb 13 14:56:20 UTC 2024] Single domain='madeuphost.crazypants.lan'
[Tue Feb 13 14:56:20 UTC 2024] Getting webroot for domain='madeuphost.crazypants.lan'
[Tue Feb 13 14:56:20 UTC 2024] Adding txt value: v_RuovXjtM3muHb4ONxRMykmZGmEViDQ9MzxFaOjkco for domain: _acme-challenge.madeuphost.crazypants.lan
[Tue Feb 13 14:56:20 UTC 2024] adding _acme-challenge.madeuphost.crazypants.lan. 60 in txt "v_RuovXjrM3mtHs4ONxRMysr4ZGmEVsDr9uzxFaOjxco"
[Tue Feb 13 14:56:20 UTC 2024] The txt record is added: Success.
[Tue Feb 13 14:56:20 UTC 2024] Sleep 2 seconds for the txt records to take effect
[Tue Feb 13 14:56:23 UTC 2024] Verifying: madeuphost.crazypants.lan
[Tue Feb 13 14:56:24 UTC 2024] Success
[Tue Feb 13 14:56:24 UTC 2024] Removing DNS records.
[Tue Feb 13 14:56:24 UTC 2024] Removing txt: v_RuovXjrM3mtHs4ONxRMysr4ZGmEVsDr9uzxFaOjxco for domain: _acme-challenge.madeuphost.crazypants.lan
[Tue Feb 13 14:56:24 UTC 2024] removing _acme-challenge.madeuphost.crazypants.lan. txt
[Tue Feb 13 14:56:24 UTC 2024] Removed: Success
[Tue Feb 13 14:56:24 UTC 2024] Verify finished, start to sign.
[Tue Feb 13 14:56:24 UTC 2024] Lets finalize the order.
[Tue Feb 13 14:56:24 UTC 2024] Le_OrderFinalize='https://certifier.crazypants.lan/acme/acme/order/v_RuovXjrM3mtHs4ONxRMysr4ZGmEVsDr/finalize'
[Tue Feb 13 14:56:24 UTC 2024] Downloading cert.
[Tue Feb 13 14:56:24 UTC 2024] Le_LinkCert='https://certifier.crazypants.lan/acme/acme/certificate/z9TlsTeZ416bVegRAPB6Nas0yxcHeuuE'
[Tue Feb 13 14:56:24 UTC 2024] Cert success.
-----BEGIN CERTIFICATE-----
MIICQjCCAemgAwIBAgIQZetRZpz18z4XOL1I6t4RQTAKBggqhkjOPQQDAjBKMRsw
GQYDVQQKExJDcmF6eVBhbnRzIENyYXp5Q0ExKzApBgNVBAMTIkNyYXp5UGFudHMg
Q3JhenlDQSBJbnRlcm1lZGlhdGUgQ0EwHhcNMjQwMjEzMTQ1NTIwWhcNMjQwMjIw
MTQ1NjIwWjAlMSMwIQYDVQeDExptsWRldXBob3N0Mi3jcmF6eXBhbnRzLmxhbjB2
MBAGByqGSM49AgEGBSuBBAAiA2IABPOmAajCDeDlfmSU1XTvXr0F1FKFRvS2QP3r
1Lbzcg78axN8DqFqy0bigTc7xfj19rPQFSSvH0AEpsHGOZc/VtvkLY11BYOe/hiM
KgTTAcYCtYehpy3MIemg79i4lnGGmaOBuDCBtTAOBgNVHQ8BAf8EBAMCB4AwHQYD
VR0lBBYwFAYIKwYBBQUHAwEGCCsGAQUFBwMCMB0GA1UdDgQWBBRVCLhIwVH1uQCj
JkBeFElFKe2xQDAfBgNVHSMEGDAWgBSkAF4FlLQpoHpJ4+rfhfprOfRjozAlBgNV
HREEHjAcghptYWRlsXBob3N0Mi5jcmF6eXBhbnRzLmxhbjAdBtwrBgEEAYKkZMYo
QAEEDTALAgEGBARhY21lBAAwCgYIeoZIzj0EAwIDRwAwRAIgGWWZjJywONRfJbJ9
R6ckolWGygVEqRPkygg7zQpJ1oACIEuhe9iyMwmHI1+RDBqbvAjS5lPxIEOjt5IJ
Ur9U+Ogv
-----END CERTIFICATE-----
[Tue Feb 13 14:56:24 UTC 2024] Your cert is in: /root/.acme.sh/madeuphost.crazypants.lan_ecc/madeuphost.crazypants.lan.cer
[Tue Feb 13 14:56:24 UTC 2024] Your cert key is in: /root/.acme.sh/madeuphost.crazypants.lan_ecc/madeuphost.crazypants.lan.key
[Tue Feb 13 14:56:24 UTC 2024] The intermediate CA cert is in: /root/.acme.sh/madeuphost.crazypants.lan_ecc/ca.cer
[Tue Feb 13 14:56:24 UTC 2024] And the full chain certs is there: /root/.acme.sh/madeuphost.crazypants.lan_ecc/fullchain.cer

You can see in the output where acme.sh uses the DNS update key to create a TXT record in your LAN DNS zone (look for the "Adding txt value" line), which is verified by step-ca and then quickly removed. Then step-ca creates a certificate and a private key, and Bob's your uncle, you're ready to deploy that certificate.

We can try the same thing again (with a different hostname) with HTTP-01 validation in standalone mode, just to verify that also works. I'll do this using the actual hostname of the box I'm currently on rather than a made-up hostname because in standalone mode, the step-ca certificate authority needs to communicate directly with the requesting host, and using a made-up hostname makes that difficult:

$ sudo acme.sh --issue --standalone -d requestor.crazypants.lan --server https://certifier.crazypants.lan/acme/acme/directory --days 5 --ca-bundle /usr/local/share/ca-certificates/root_ca.crt --keylength ec-384 --dnssleep 2

[Tue Feb 13 15:36:32 UTC 2024] Using CA: https://certifier.crazypants.lan/acme/acme/directory
[Tue Feb 13 15:36:32 UTC 2024] Standalone mode.
[Tue Feb 13 15:36:32 UTC 2024] Single domain='requestor.crazypants.lan'
[Tue Feb 13 15:36:32 UTC 2024] Getting webroot for domain='requestor.crazypants.lan'
[Tue Feb 13 15:36:32 UTC 2024] Verifying: requestor.crazypants.lan
[Tue Feb 13 15:36:32 UTC 2024] Standalone mode server
[Tue Feb 13 15:36:35 UTC 2024] Success
[Tue Feb 13 15:36:35 UTC 2024] Verify finished, start to sign.
[Tue Feb 13 15:36:35 UTC 2024] Lets finalize the order.
[Tue Feb 13 15:36:35 UTC 2024] Le_OrderFinalize='https://certifier.crazypants.lan/acme/acme/order/6eKbdhbyZlRr2yKHuOwbfBfWJSv0yhhl/finalize'
[Tue Feb 13 15:36:35 UTC 2024] Downloading cert.
[Tue Feb 13 15:36:35 UTC 2024] Le_LinkCert='https://certifier.crazypants.lan/acme/acme/certificate/IjCB8SmgTiRa5IMGYv7NjeROtyBYE8pv'
[Tue Feb 13 15:36:35 UTC 2024] Cert success.
-----BEGIN CERTIFICATE-----
MIICQTCCAeagAwIBAgIRAJdDYtM3cYEc6Q0ICQsfXiswCgYIKoZIzj0EAwIwSjEb
MBkGA1UEChMSQ3JhenlQYW50cyBDcmF6eUNBMSswKQYDVQQDEyJDcmF6eVBhbnRz
IENyYXp5Q0EgSW50ZXJtZWRpYXRlIENBMB4XDTI0MDsxMzE1MzUzMloXDTI0MDIy
MDE1MzYzMlowIzEhMB8GA1UEAxMYdmVxdWVzdG9yLmNyYXp5cGFudHMubGFuMHYw
EAYHKoZIzj0CAQYFK4EEACIDYgAEnB8ovaGkyhcVkUgTqzlNLZYbChhj4Z5DkWNM
8MrcjeS95cXJbswSlKJb6XCRPJOjbYy/Zb+C6hEm7Hy3tLs3KaqsnUqtE0b38JnL
nYJax1Ook0LhcZJez8GKe10fdhwko4G2MIGzMA4GA1UdDwEB/wQEAwIHgDAdBgNV
HSUEFjAUBggrBgEFBQcDAQYIKwYBeQUHAwIwHQYDVR0dBBYEFNZwoKys/SJup9BP
FLPhSm00twTEMB8GA1UdIwQYMBaAFKQAXgWUtCmgeknj6t+F+ms59GOjMCMGA1Ud
EQQcMBqCGHJlcXVlc3Rvci5jcmF6eXBhbnRzLmxhbjAdBgwrBgEEAYKkZMYoQAEE
DTALAgEGBARhY21lBAAwCgYIKoZIzj0EAwIDSQAwRgIhAOH5APW1LHyoC0ddjvTr
h6++9pMMTRdomP/QpoLk278NAiEA6Q7UUH8MsgTK5dSeuWMYxt+G6ejirwERzsDl
7HJ3n+Q=
-----END CERTIFICATE-----
[Tue Feb 13 15:36:35 UTC 2024] Your cert is in: /root/.acme.sh/requestor.crazypants.lan_ecc/requestor.crazypants.lan.cer
[Tue Feb 13 15:36:35 UTC 2024] Your cert key is in: /root/.acme.sh/requestor.crazypants.lan_ecc/requestor.crazypants.lan.key
[Tue Feb 13 15:36:35 UTC 2024] The intermediate CA cert is in: /root/.acme.sh/requestor.crazypants.lan_ecc/ca.cer
[Tue Feb 13 15:36:35 UTC 2024] And the full chain certs is there: /root/.acme.sh/requestor.crazypants.lan_ecc/fullchain.cer

That's neat and all, but I'm going to stick with DNS-01 validation for the rest of the tutorial—I find it considerably simpler to deal with, especially on hosts where port 80 is already in use.

Let’s issue some real certs!

I'm going to use my LAN's Gitea host for my first issuance. Gitea is a git repo that can be self-hosted, and I'm running it inside of an LCX container; its web interface comes by default with a self-signed certificate and will be a great (and relatively simple) guinea pig for our setup.

One very important thing to note: from here on in the tutorial, the examples will be using bigdinosaur.lan for their LAN domain rather than the crazypants.lan example domain we've been sticking with so far. The reason for this is that I'm creating and validating these instructions on my actual LAN since it's easier for me to do this with my real existing services rather than spinning up new test boxes and re-installing all the stuff I already have installed.

Just remember to continue substituting in your LAN domain name whenever you see mine; otherwise, things probably won't work right for you!

But wait, some quick prerequisites

There are three things we must accomplish first—on this box or on any host where you'll be requesting a certificate. We must get our step-ca certificates into the box's trusted root store, we must get acme.sh configured and installed, and we must get our DNS signing key copied and ready for use. The instructions for doing all these things are floating somewhere above, earlier in this article, but we'll recap briefly here:

  1. Copy the step-ca root and intermediate certificates from the step-ca server to /usr/local/share/ca-certificates/
  2. Run sudo update-ca-certificates to load the certificates
  3. Elevate yourself to root: sudo -i
  4. Install git and curl: apt install git curl
  5. Clone the acme.sh repo locally: git clone https://github.com/acmesh-official/acme.sh.git
  6. Navigate to the clones acme.sh directory: cd /root/acme.sh
  7. Install acme.sh: ./acme.sh --install -m [email protected]

You'll then need to append the same set of variables to your acme.sh account.conf file as we did earlier in the tutorial so that acme.sh knows what to do with itself:

SAVED_NSUPDATE_SERVER='dnsbox.crazypants.lan'
SAVED_NSUPDATE_KEY='/root/rndc.key'
SAVED_NSUPDATE_ZONE='crazypants.lan'
CA_BUNDLE='/usr/local/share/ca-certificates/root_ca.crt'
USER_PATH='/usr/local/sbin:/usr/local/bin:/usr/sbin:/usr/bin:/sbin:/bin:/snap/bin'

(Make sure to substitute in your own DNS server and LAN domain name as needed.)

Now the DNS signing key. This one's easy—just copy rndc.key from your DNS box to /root/rndc.key, and that's it.

The biggest prerequisite of all: Your devices and browsers

This one's a biggie, and it's one of the big stumbling blocks to running a LAN-only CA: Your devices won't trust that CA or any certificates it issues until you tell them to, by importing the CA's root and intermediate certificates into your browser's trust store.

There are many ways to do this—almost as many different ways as there are browser and operating system combinations, and we'd be here all day if we went through them all. The general procedure looks like this:

    1. Make your step-ca root and intermediate certificates available to the devices on which you want them to be trusted. You can email the files to yourself, post them on a LAN-only web server and download them, or re-create them manually via copy-n-paste.
    2. Download or open the root and intermediate certificates on the device or in the browser you want to use.
    3. Import the certificates into your root trust store, and then change the certificates' trust status so that your browser and/or operating system knows to trust that CA for certificate signing.

(Firefox users should note that the Firefox browser maintains its own certificate store separate from the operating system. If you want this to work with Firefox, you'll need to also import your CA root and intermedia certs to Firefox's cert store.)

The deployment strategy

Whew. So we can make test certs, and we've got clients trusting our CA. The last big thing we need to figure out before we issue our first real certificate is the same thing anyone who's used LetsEncrypt before has had to figure out: How to deploy that certificate once it's created.

Acme.sh will store our completed issued certificate and private key underneath the root user's home directory. But our self-hosted application needs that cert and private key to be somewhere else—somewhere it can read from. So we need to figure out some automation glue to copy our certificate and key to where they're needed after they're issued.

Fortunately, acme.sh has this covered—it can be configured to run a script after issuance by means of the --post-hook flag. We just need to write a short script that will do the moving for us. We can also use that script to restart the service of the self-hosted thing so that its web interface picks up and uses our new certificate.

It's a bit of a configuration quirk that if you're going to use a post-hook (or any hook) with acme.sh, you must specify that hook the first time you request a certificate. Acme.sh will then automatically use the same hook script when it renews the certificate. There doesn't appear to be a way to add a hook script later that doesn't involve a bunch of config file editing, and I know we're all getting sick of that by now, so we'll want to have the --post-hook flag specified during the very first issuance request.

This can sometimes create a bit of a chicken-and-egg problem—how do I write my script to move my cert and key files if I don't quite yet know what those files are named? You could take a guess—acme.sh is consistent in its naming and you'd probably guess right!—but I prefer to create an empty post-hook script to specify during issuance and, after everything's issued, go in and flesh out the post-hook script with the right paths and stuff so that when the cert renews and the script is run again, it will do what we want.

So, let's get that script file created:

$ sudo touch /usr/local/bin/acme-post.sh
$ sudo chmod +x /usr/local/bin/acme-post.sh

We'll come back and actually put stuff into that script once we're done.

Okay, now let’s issue some real certs!

Everything's in place, so let's ask for our cert. Remember that I'm now using bigdinosaur.lan since I'm doing these commands on my actual LAN domain—you'll be substituting in your own proper hostnames and LAN domain name:

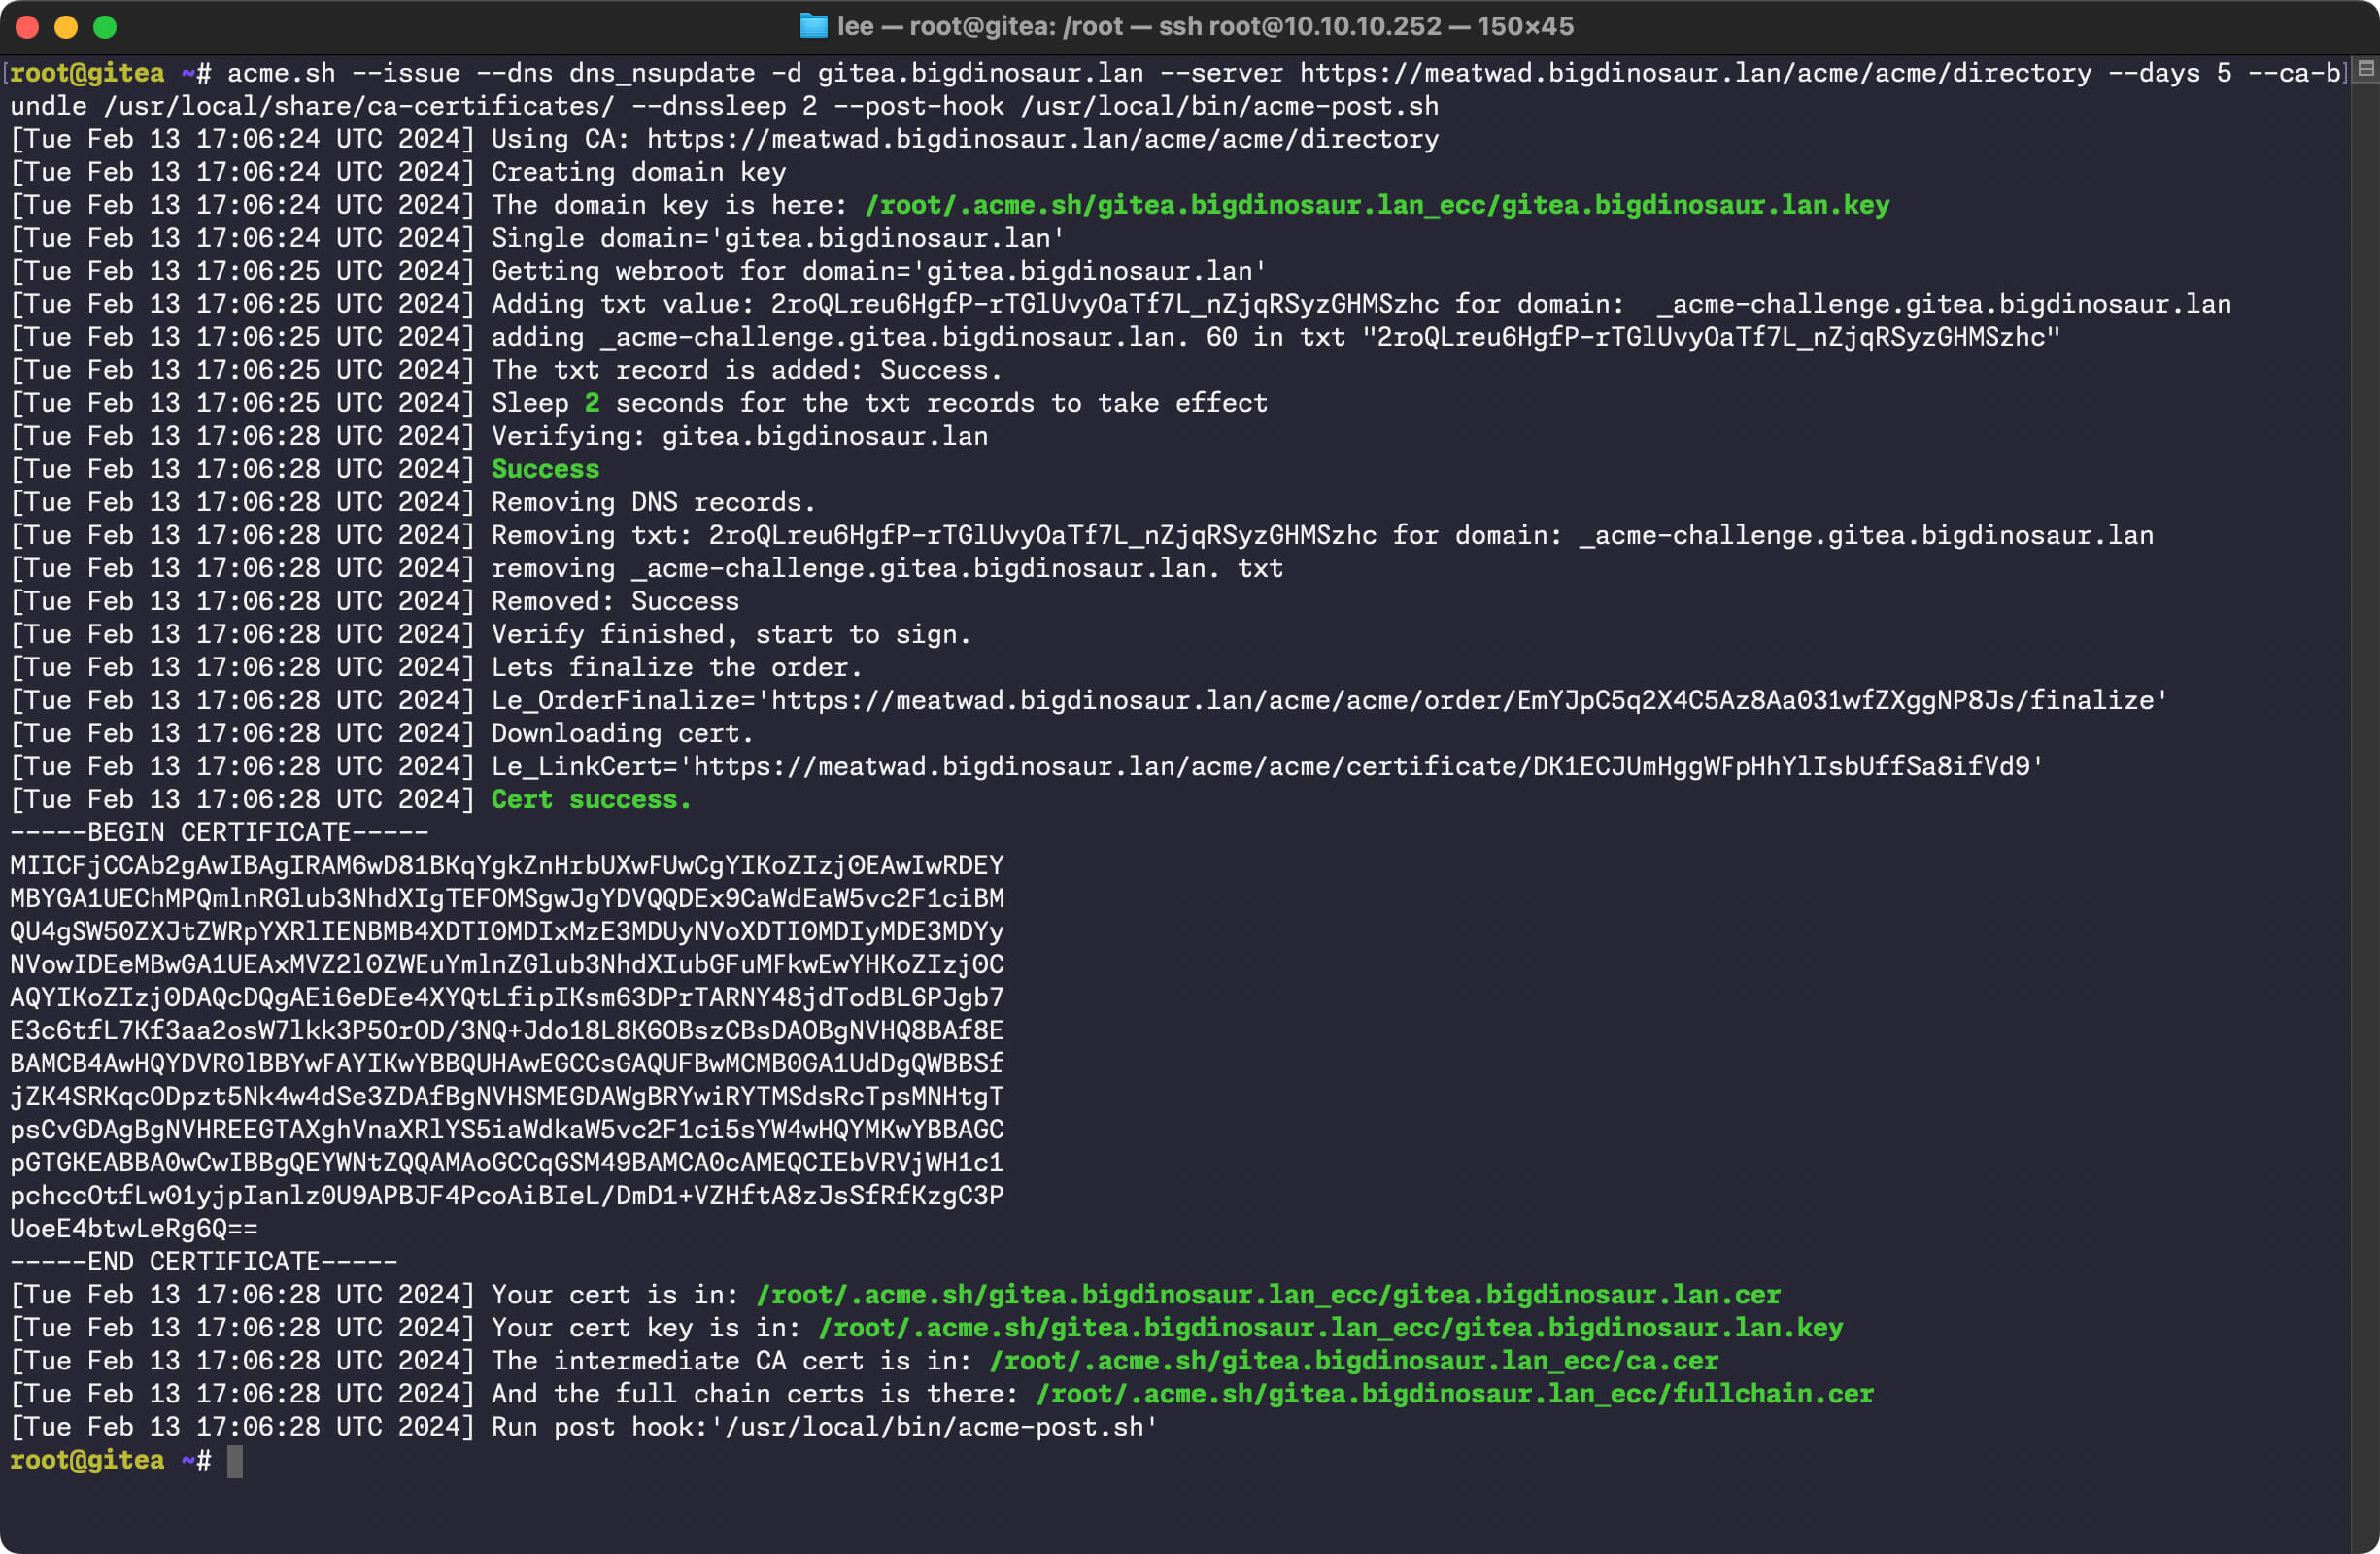
$ sudo acme.sh --issue --dns dns_nsupdate -d gitea.bigdinosaur.lan --server https://certifier.bigdinosaur.lan/acme/acme/directory --days 5 --ca-bundle /usr/local/share/ca-certificates/ --dnssleep 2 --post-hook /usr/local/bin/acme-post.sh

And, hey, lucky for me, it all worked!

Screenshot of acme.sh output
Certificate issued!
Certificate issued! Credit: Lee Hutchinson

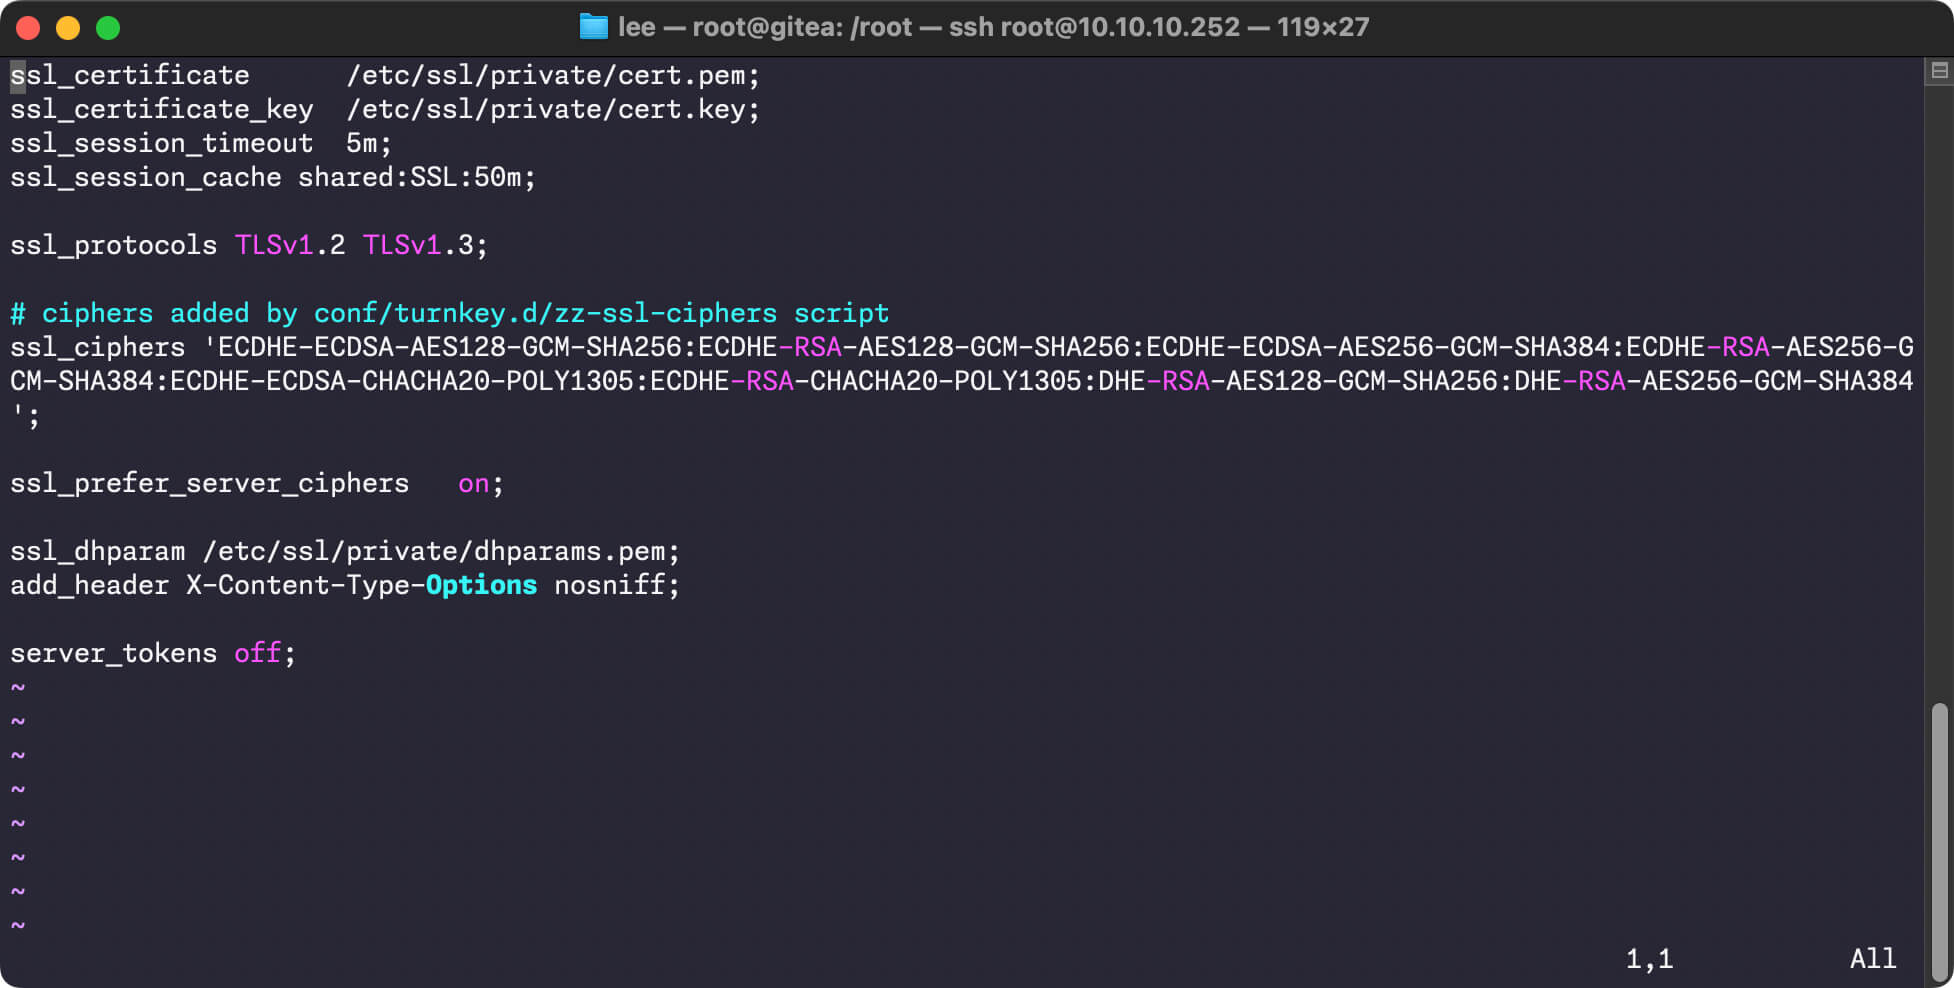
Now let's see what we need to do here to get the cert deployed. This particular box I just issued a cert for uses nginx as a reverse proxy for Gitea, and so I need to first peek in the nginx configuration to see where the existing self-signed certs are:

Screenshot of nginx config file
The top lines show the cert and key files we're targeting.
The top lines show the cert and key files we're targeting. Credit: Lee Hutchinson

Looks like we need to copy our start-ca-issued cert and key to the /etc/ssl/private/ directory, using the names cert.pem for the certificate and cert.key for the key.

We know from acme.sh's output where our newly issued cert and key are, so let's combine this together and use all that info to build our acme-post.sh file. I'm going to make its contents look like this:

#!/bin/bash
chmod +w /etc/ssl/private/cert.*
mv /etc/ssl/private/cert.pem /etc/ssl/private/cert.oldpem
mv /etc/ssl/private/cert.key /etc/ssl/private/cert.oldkey
cp /root/.acme.sh/gitea.bigdinosaur.lan_ecc/gitea.bigdinosaur.lan.cer /etc/ssl/private/cert.pem
cp /root/.acme.sh/gitea.bigdinosaur.lan_ecc/gitea.bigdinosaur.lan.key /etc/ssl/private/cert.key
chmod 400 /etc/ssl/private/cert.*
systemctl restart nginx.service

When executed (either manually or automatically as a post-hook by acme.sh), this script will move the existing cert and key out of the way, copy the new ones in, adjust everything's permissions properly, and then restart the nginx service.

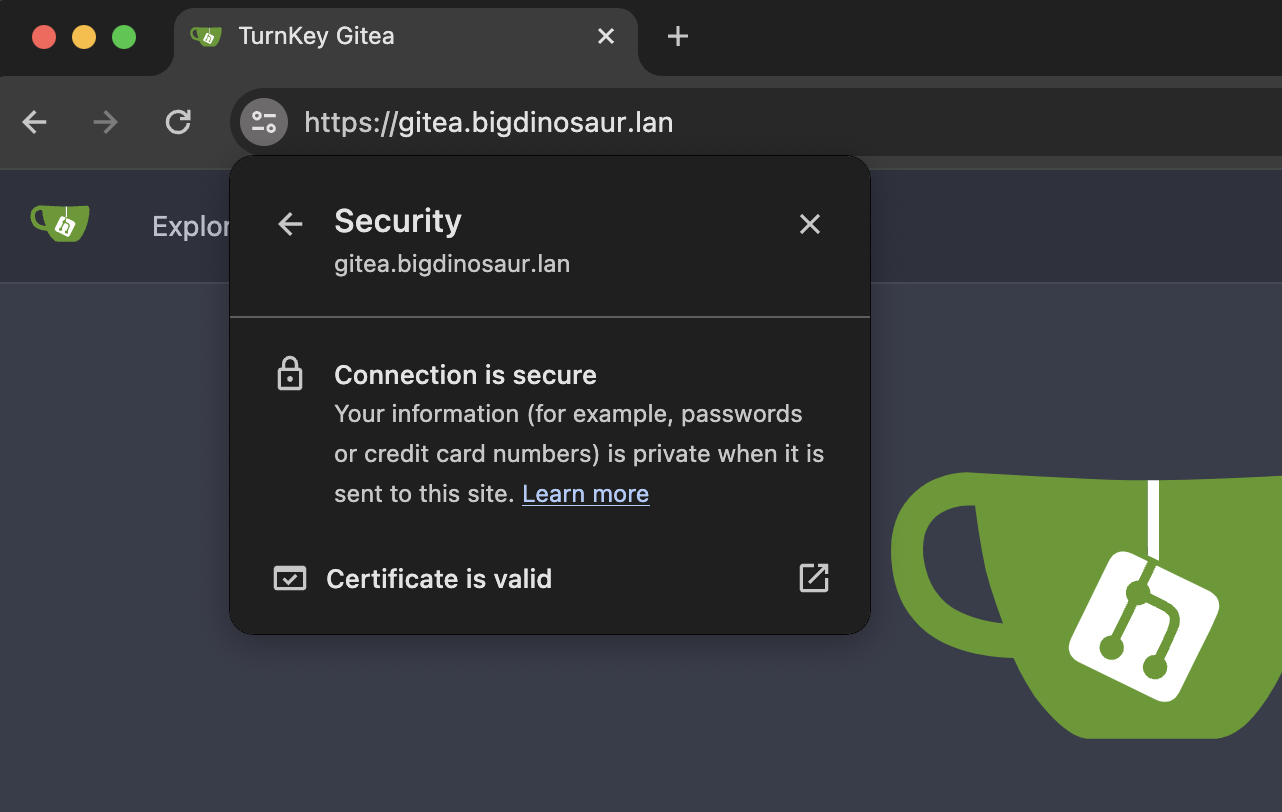
Let's execute it—after all, from here on, this is what's going to happen automatically when acme.sh requests a renewed certificate. If the post-hook script works, upon refreshing the Gitea console, this will show up:

Screenshot of Gitea interface showing valid SSL certificate
Our LAN-issued certificate is valid!
Our LAN-issued certificate is valid! Credit: Lee Hutchinson

Congrats—this box will now have a fresh start-ca-generated, acme.sh-deployed certificate installed on it every five days. Hooray!

More complicated deployments await

For most services on your LAN, deploying a cert will look pretty much like the Gitea example: There's probably a reverse proxy involved, and that reverse proxy just needs to be supplied with the right certificates and restarted.

But some things are a little more complex—and, fortunately, acme.sh comes to the rescue by having a whole pile of different deployment hooks that we can use. If you have a Synology LAN, there's a deployment hook for you. If you have a Proxmox VE server, there's a deployment hook for you. If you've got docker containers, there's—well, there's not a deploy hook specifically, but there's a method to follow.

(The one thing that I can't quite get to work right now is automated deployment to my Unifi Dream Machine Pro, due to Ubiquiti having completely broken custom certs within the past couple of months. Ubiquiti also doesn't provide a GUI-based method to supply custom certs, which is disappointing as hell—the company needs to put on its big-boy pants and change its unjustifiably dumb approach to self-signed certs on notionally "enterprise" equipment. If anyone from Ubiquiti is reading this: Please stop doing things that are detractive to your users' overall security and fix your broken self-signed cert situation.)

We’ve done it! What have we done?

Assuming everything works—which is never a given with computers, God, how I hate them—we've got a functional CA somewhere on the LAN and acme.sh on one or more LAN clients. Acme.sh is capable of automatically requesting certificate renewals, and step-ca is capable of performing those renewals.

If you're like me, once equipped with step-ca, you'll go on a SSL/TLS certificate spree, happily shoving valid auto-renewing certs down the throats of every self-hosted application on your LAN. It's a neat feeling, knowing that each time you initially request a new certificate will (hopefully) be the last time you have to care about that certificate. If we've done our jobs right, it will just magically work from here on.

But wait! Why the hell didn’t we use a real domain?!

Ahhh, that's the question indeed—because doing this with a "real" domain (that is, one from a registrar rather than a LAN-only internal domain) should notionally mean we don't have to do nearly as much work. After all, a "real" domain will already be trusted, so no screwing around with importing those CA root and intermediate certificates. That's preferable, right?

Maybe—but maybe not. Here we run into a fundamental choice: Do we want our certificate renewal machinery to be complex, or do we want our LAN DNS to be complex? That's the trade-off we face. Using a real domain eliminates some complexity on the cert side but amps up the complexity on the DNS side.

To explicate: Currently, with the way we're set up, we've got a made-up internal domain that we're running DNS for. This provides us with a lot of conveniences, including not having to worry about how to handle external non-LAN DNS requests. If you use a real domain—especially one that contains publicly visible DNS records—we suddenly need to care a whole lot more about how DNS works and how we handle a LAN client wanting to look up a LAN-only resource versus a public client wanting to look up a public resource versus a LAN client that wants to look up a public resource (if you have any LAN-hosted services that are also public).

The "correct" way to solve this problem in a big production environment is by implementing split-horizon DNS and DNS views. In a homelab context, though, we can cheat—if you don't mind your homelab DNS entries being visible to the world, you can dispense with the local bind server altogether and host your "internal" DNS zone publicly. That way, you can straight-up use LetsEncrypt and DNS-01 validation to do what we're doing, but without most of the setup work. (The gross trade-off is that all your private LAN-only DNS is sitting there in public with its ass hanging out, hostnames visible to anyone who cares to dig.)

If there's enough interest, I can do a follow-up piece where we do that exact setup. I chose to stick with a made-up domain and LAN-only DNS for this tutorial primarily because it lets us get our hands dirty in interesting ways; using an existing domain is a lot quicker. And not to be too terribly repetitive, but putting your private DNS entries in a public server really is kludg-y and gross.

We’re done!

And that, dear readers, is how we do that. If you're looking for more projects to satisfy the "homelab sysadmin with control issues" itch, then stay tuned—I have a whole pile in the works.

To tease a bit, working through this piece (and part one) would have been a lot more frustrating and a lot slower without Proxmox VE, which I leaned on quite heavily to quickly build (and re-build!) and validate the configurations used in the tutorials. I had never used Proxmox before January of this year, and it's already proven incredibly valuable—so much so that it'll likely remain a permanent fixture in my homelab.

So that will likely be what we explore next: adventures in containerization and virtualization with Proxmox. Catch everyone then!

Listing image: Aurich Lawson | Getty Images

Photo of Lee Hutchinson
Lee Hutchinson Senior Technology Editor
Lee is the Senior Technology Editor, and oversees story development for the gadget, culture, IT, and video sections of Ars Technica. A long-time member of the Ars OpenForum with an extensive background in enterprise storage and security, he lives in Houston.
123 Comments